AI Auto-Reply
This article explains how to build an AI Auto-Reply chatbot that answers questions by referring to an uploaded PDF document.
What you need beforehand
-
A PDF file that the bot will consult (FAQ, manual, etc.)
Process overview
-
Upload a PDF and register it as a data source
-
Create a chat flow
-
Add an AI Auto-Reply action and configure its menu
-
Define follow-up actions for the End / Human hand-off buttons
-
Save → Enable the flow and run a test
1. Upload the PDF data source
-
Click Data Sources ▸ Documents in the top navigation.
-
Click the Upload document button in the upper right.
-
Choose Select file and pick your PDF.
-
The PDF you upload here becomes the knowledge base the AI consults.
-


2. Set up the chat flow
-
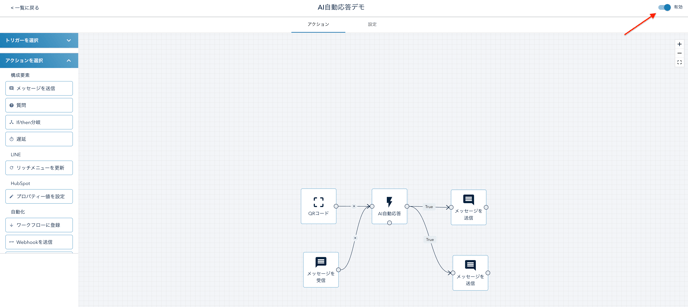
Open Communication ▸ Chat Flows and create a new flow.
-
From Actions, drag AI Auto-Reply onto the canvas.
-
Click the AI Auto-Reply node and edit the panel on the right.
Main fields on the right-hand panel
| Field | Description |
|---|---|
| ①AI Role | Prompt that defines answer style (e.g., “Reply in ≤ 200 characters…”) |
| ②Data Source | Select the PDF you uploaded in step 1 |
| ③AI Name | Sender name that appears in LINE |
| ④Greeting Message | Message sent automatically when AI is invoked |
| ⑤End Button Label | Label for the button that ends the conversation |
| ⑥Human Hand-off Button Label | Label for switching to a human agent |
| ⑦Hide Human Hand-off Button | Check to show only the End button |
| ⑧Save Question / Answer to Property | Choose HubSpot properties if you want to log Q&A history |

3. Configure button branches
End button (True branch)
Connect the right-side port to Send Message and enter your completion text.
Human hand-off button (False branch)
Connect the lower port to Send Message and enter a hand-off notice.
4. Enable and test the flow
Toggle the switch in the upper-right corner to ON to publish the flow.

Related articles
-
Step 2 – Building a Chatbot – Basic chat-flow operations